FYI, I stumbled on a nifty (and free) utility to generate the certificates you need to use with OpenVPN.
You can find it here:
http://openvpn.se/mycert/
Friday, September 29, 2006
Easy Certs
OpenVPN client configuration
Configuring OpenVPN for client use turned out to be rather simple. We installed the OpenVPN GUI found at http://openvpn.se, and then went to the configuration files stored in this location:
c:\program files\openvpn\config
First, we copied the files we generated on the server to this folder. Since I was installing on a laptop, I named my key files "laptop.key" and "laptop.crt". I placed copies of those files in this folder. I also need the "ca.crt" file from the server stored in this location. All three files were copied over using a USB thumb drive, so there is no risk of them getting into the wrong hands.
My configuration file looked like this:
client
remote 205.174.168.29 1194
dev tun
# proto udp
comp-lzo
ca ca.crt
cert laptop.crt
key laptop.key
verb 3
I then double clicked on the OpenVPN icon in the system tray, and lo and behold, I was connected to the local network at work!
After a bit though, it started randomly dropping the connection and then reconnecting. This was annoying, so I did a bit more digging.
By adding these lines to the config, the connection became much more stable:
persist-key
persist-tun
Thursday, September 28, 2006
OpenVPN Server configuration
As promised, here are some more details about how I configured my OpenVPN server. The machine in question is running a recent build of FreeBSD, with ports installed. If you haven't used FreeBSD, you might want to consider it. It's a very easy to use, stable system (although if you've ever tried to run a serious Java application on it, you'll quickly become frustrated. FreeBSD + threads = headache, IMHO).
Installing OpenVPN on FreeBSD is as simple as this:
admin@max>cd /usr/ports/security/openvpn
admin@max>make install clean
And that's it. After a few minutes, I had a nice, clean installation of OpenVPN. Now to configure it.
In the FreeBSD world, configuration files are stored in /usr/local/etc/openvpn. So, I went there, and followed the instructions found here: http://openvpn.net/howto.html#config (Please note that the docs indicate helpful scripts for setting up keys etc. are in /usr/share/doc/openvpn, but in the BSD world they seem to be in /usr/local/share/doc/openvpn).
The only hiccup I ran into was that the docs give examples using the bash shell, and I tend to stick to tcsh. Not a big deal. I just ran these commands:
admin@max>pkg_add -r bash
admin@max>rehash
admin@max>exec bash
and I was in bash, where things all worked the docs indicated. Simple enough.
Once I had all my certs set up, my final openvpn.conf file looked something like this:
[tcs@max] /usr/local/etc/openvpn> cat openvpn.conf
# Specify device
dev tun
proto udp
# Server and client IP and Pool
server 10.8.0.0 255.255.255.0
ifconfig-pool-persist ipp.txt
# Certificates for VPN Authentication
ca /usr/local/etc/openvpn/ca.crt
cert /usr/local/etc/openvpn/server.crt
key /usr/local/etc/openvpn/server.key
dh /usr/local/etc/openvpn/dh1024.pem
# Routes to push to the client
push "route 10.10.132.0 255.255.255.0"
# route all traffic through vpn
push "redirect-gateway def1"
# Use compression on the VPN link
comp-lzo
push "dhcp-option DNS 10.10.132.123"
# Make the link more resistent to connection failures
keepalive 10 60
ping-timer-rem
persist-tun
persist-key
# Run OpenVPN as a daemon and drop privileges to user/group nobody user nobody
group nobody
daemon
Finally, since I wanted to use my server as a gateway to my internal LAN, I had to change my pf.conf file (the firewall configuration). The relevant line looks like this:
# nat for vpn
nat on $int_if from $vpn_net to any -> ($int_if)
where $inf_if is the interface device connected to the internal network, and $vpn_net is the subnet I've assigned to the VPN (10.8.0.0/24).
More on this, and on client configuration, when I have a bit more time.
Update: Part three is here.
The Adventure Begins
So I've started getting together the things I'll need to build my biquad wifi antenna. After some scrounging and a few trips to the web, I have acquired the first two bits of equipment I need to start: copper, and an n-connector. They're not much to look at yet, but here they are:
The copper was free -- scrap donated from a local sheet metal shop, and bent into shape very carefully using a couple of bits of lumber. It was fairly trivial.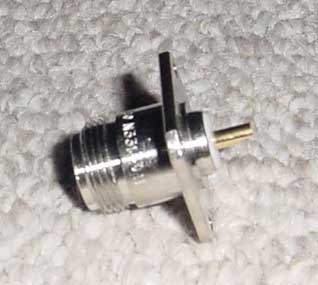
The n-connector set me back slightly under six dollars. Next, I'll see if I can scrounge some copper wiring somewhere, and bend it into the appropriate shape.
Monday, September 25, 2006
Free Wifi Internet for around $20
The city I live near has free WiFi Internet, with very good coverage inside the city limits. Unfortunately, I'm some 15 miles outside those limits, and thus forced to pay for either DSL or cablemodem service. This just doesn't seem right to me. Free Wifi access a scant 15 miles away? There has to be some way to connect.
So, it's off to Google, and lo and behold, I discover this: How to build a biquad wifi antenna, over at Engadget. Given some copper, about $20 worth of gear, and a used satellite dish, you can vastly extend the range of a wifi network.
A bit more reading over here, at Martybugs, suggests that the actual antenna portion can get a higher gain with a few modifications to the design given at Engadget. Checking out Martybugs' sources leads me here, to Trevor Marshall's information. This gives even more detailed information. Hey -- I have a soldering iron and a highly developed sense of adventure, so why not?
I think I'll give it a go. I'll keep you posted.
Sunday, September 24, 2006
Virtual Private Networking for Everyone - OpenVPN
I own a small tech firm on the East coast, and have long wanted a safe, secure method of connecting from my residence (about 15 miles outside of the city) to the LAN at the office. My network at the office is mixed, consisting of Windows XP machines, various Macs, and both Linux and FreeBSD servers. At home we have a single XP machine, and several Mac notebooks (iBooks and Intel-based MacBooks).
Naturally, the best solution for connecting between the two locations would be a Virtual Private Network of some sort. Given the fact that I am notoriously cheap, I decided to search around and see if I could come up with some sort of open source solution... and it took me all of fifteen minutes with my favourite search engine to come up with a viable alternative: OpenVPN. It took me a bit longer to get everything working as well as I wanted to, but not all that long. Read on if you'd like to see how I did it.
Why use a VPN?
There are any number of reasons why you might want to have a VPN in place. For example, with a properly set up VPN, you can access resources at one location from the other. So if I want to print something at the office from home, I can do that. Similarly, if I need to recover a file from offsite back up (read: the backup server I keep in my basement) I can do that without having to drive all the way home.
Of course, there are the more obvious things a VPN will give you. If you use a wireless home router that's more than a year or two old, chances are it uses one of the more archaic forms of encryption, like WEP. The problem with these encryption methods is that they don't actually protect your data; anyone with the inclination could park outside your house, apartment building, whatever, and "sniff" your network traffic. Encrypting all traffic between your web browser and some secure gateway will take the wind out of some potential hacker's sails. Remember, just because you're paranoid doesn't mean they're not out to get you....
Or, if you're so paranoid you don't even trust your ISP, you can use a VPN between your home computer and a secure gateway you control somewhere else (like your office) and encrypt allthe traffic that exists on your ISP's network. It won't get decrypted until it hits your gateway machine. Of course, assuming you are a relatively law abiding citizen, this might be going a bit far (unless you are partial to tinfoil hats, that is).
Why OpenVPN?
OpenVPN is free, cross platform, and relatively easy to install and maintain. It also uses a very secure ecryption algorithm -- 128 bit Secure Sockets Layer (SSL) or the same level of encryption you probably use when you access your banking information online. I figure if it's good enough for the major North American financial institutions, it's probably sufficient for my purposes.
Installing OpenVPN
We decided to install OpenVPN on a FreeBSD box, using ports. It was trivial. We'll post a detailed howto here in a week or so. But if you have access to a FreeBSD box, ports is the way to go. Trust me.
Installing OpenVPN clients
Reading the documentatation found on OpenVPN's web site suggests that this is a daunting task. It probably is, if you elect to go their route. We decided to stand on the shoulders of those who have gone before, and use some simple solutions where the heavy lifting is done for us.
For the Windows clients, we went with OpenVPN GUI (http://openvpn.se). Installing it took about 30 seconds, and configuring it took a bit longer (but not much).
For the Macintosh clients, we went with Tunnelblick (http://www.tunnelblick.net). Granted, it has a rather silly name, but it works very, very well, and didn't give us any problems on either the G4 based Macs, or the Intel based machines.
Stay tuned for the technical details of how we made this all work...
Update: Part two is here.
Subscribe to:
Posts (Atom)
