Tuesday, March 04, 2008

PBX in a Flash vs. trixbox

As promised, I have spent some time comparing the various benefits of PBX-in-a-Flash over trixbox. In a nutshell, my conclusion is relatively straightforward.


It's worth switching.

Why, you may ask? Well, the reasons are many and varied, but here are the high points:

1) Upgrades. If you've spent any time poring over the various email lists for trixbox, you will quickly come to realize that the general consensus with respect to upgrading trixbox is as follows: if it ain't broke, don't fix it. Upgrading trixbox can be a nightmare (something I've personally experienced), and the simplest solution is to either (a) live with an older version; or (b) do a clean install. Upgrading PBIAF, though, is really, really simple, and it actually works. Everything is web-based, wizard driven, and painless. In fact, the default installation regularly checks for both core and module upgrades, and offers to do it for you.

2) Extending functionality. PBIAF has a rapidly growing set of modules that are simple to install, and add nice functionality to the base system. Wait, you say -- so does trixbox! Well, yes, it does, but when it comes to installing and upgrading these modules, PBIAF is the hands down winner.

For these two reasons alone, it's worth the upgrade. 

Highly recommended.

Thursday, February 21, 2008

PBX in a Flash

Last week I downloaded and installed the new PBX in a Flash alternative to Trixbox. I have had excellent luck with Trixbox, and no real complaints, but I like to keep abreast of things, had some time on my hand, and thought I'd give it a whirl.

I am impressed.


Installation was simple, and it has all the functionality of Trixbox, and then some. Like Trixbox, it uses FreePBX for the actual management of the PBX, but unlike Trixbox, it runs on CentOS 5, and lacks the annoying "feature" of having all Zap functionality die if you happen to be running on a non-multicore CPU.

There are a host of modules already available, including some nifty text-to speech features, but I haven't had an opportunity to test those as of yet. I plan on doing so next week, just to see how things work.

One added bonus -- for some reason, PBX-in-a-Flash actually fixed one annoying problem I had with Trixbox: on my outbound trunk using Vonage, I often had problems with IVRs (when I was dialing the phone company to complain about another billing error, for example). The whole "press one for sales, two for tech support" etc. didn't work a lot of the time. Now it does.

That alone was worth making the switch.

Tuesday, December 18, 2007

Browse securely with OpenVPN

Sometimes you find yourself in a situation where you are forced to connect to the outside world through a decidedly insecure connection. Perhaps you are in an airport, using free Wifi, or a hotel room. Or, maybe you happen to be on the Rogers network, and you've read about the tendency of that ISP to watch what you are doing on line. Whatever the case may be, you are in a situation where security is somewhat less than ideal. If you have access to a machine on a secure connection somewhere else in the world, and that machine has either a static IP address or is configured through a free service such as dyndns.org, you can set things up so that all your Internet traffic is encrypted, and passes through the known, secure machine before coming to your local machine.


This is not difficult to set up.

First, you have to have OpenVPN server set up on the remote machine. We have covered this before, so if you don't have it in place, then go install and configure it. The instructions here are virtually identical to those we set up before, with one important difference -- we are going to tell OpenVPN to redirect all traffic through itself, so nothing going to your local machine (which I'll call a laptop) or leaving it will pass unencrypted. You are browsing so that all traffic is SSL encrypted.

You will recall that OpenVPN server is conrtolled using a file in /usr/local/etc/openvpn (at least on FreeBSD). Copy that file to one called "openvpnredir.conf" and edit it. We are going to change two things: the port that OpenVPN listens to, and we are going to add a directive that tells OpenVPN to redirect all traffic through its secure connection. Here is the file, with the changes higlighted in red.

# Specify device
dev tun

port 1195

# Server and client IP and Pool
server 10.9.0.0 255.255.255.0
ifconfig-pool-persist ipp2.txt

# Certificates for VPN Authentication
ca /usr/local/etc/openvpn/ca.crt
cert /usr/local/etc/openvpn/server.crt
key /usr/local/etc/openvpn/server.key
dh /usr/local/etc/openvpn/dh1024.pem


# Routes to push to the client
# in the next line 192.168.xxx.0 should be the ip range of your internal network
push "route 192.168.xxx.0 255.255.255.0 default" 

# route all traffic through vpn
push "redirect-gateway def1"

# Use compression on the VPN link
comp-lzo

# change the ip address in the next line to whatever dns you want to use
push "dhcp-option DNS 192.168.0.100"

# Make the link more resistant to connection
failures keepalive 10 60

ping-timer-rem
persist-tun
persist-key

# Run OpenVPN as a daemon and drop privileges to user/group nobody user nobody
group nobody
daemon


As you can see, the changes are minimal. Now, on the client side, find the configuration file you use to set up a VPN connection. On Macs, it's in ~/Library/openvpn. On Windows, it's usually in C:/Program Files/OpenVPN/config.

Duplicate that file, and change the name to something meaningful (i.e. Redir OpenVPN, or whatever), and then change the line that reads "port 1194" to "port 1195".

Now, you should have a new vpn connection available to you, and all traffic will go through the VPN server.

Monday, December 17, 2007

Trixbox phones home?

Nerdvittles has an interesting post today -- apparently, trixbox phones home at 3:41 AM each day and gets a list of shell commands to run:

You may have read that a user discovered last week that current trixbox systems as recently as today include a remotely-configurable BOT, a software program that can execute certain commands locally once it receives its instructions. Reportedly, trixbox’s registry.pl “phones home” to Fonality via the Internet at 3:41 a.m. each morning to get a list of Linux commands to run. It then executes those Linux commands on your server while you’re sleeping. If the assertions of trixbox end users are true and we have no reason to believe otherwise, the existence of this remotely-configurable BOT had never been disclosed to unsuspecting users whether they were individuals or corporations. In fact, it doesn’t appear that even trixbox resellers were aware of the existence of the remotely-configurable BOT.
This is interesting, and disturbing. To be fair, the folks at Nerdvittles suggest that they "don’t for a minute believe that Chris Lyman and other senior management of Fonality knew about this in advance", but they certainly know about it now!

This is cause for concern. Since the ability to remotely execute shell commands exists, it's only a matter of time before someone else figures out how to exploit it.

Maybe it's time to accelerate my testing of pbx-in-a-flash....

Monday, November 12, 2007

Use the Linksys SPA922 as a Remote Extension

Last time I mentioned that I had used the Linksys SPA922 IP Phone as the "handset of choice" for phones. I also indicated that I wanted to have one as a remote extension -- i.e., it has a standard extension number, is part of the PBX system, can make and receive calls, etc., but is physically outside of the network.

This turned out to be relatively easy, once I figured out the firewall settings.

Setting up a remote extension using Asterisk/Trixbox is not that difficult, and consists of three basic steps:

1) Create the extension in Trixbox
2) Make some firewall modifications on the trixbox end
3) Plug in and configure the remote extension itself (i.e. the physical phone)

These steps are explained in more detail below:


Create the Extension in Trixbox
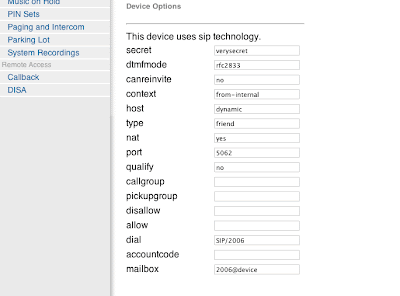
First we need to have an extension to play with, so we'll log onto our Trixbox installation using our favourite web browser, and choose "FreePBX" from the "Asterisk" menu. This pops up a new browser window (or tab) and allows us to create a new extension, among other things. Choose "Setup" from the top menu, then "Extensions" from the menu on the left, and create a new SIP extension. Fill in values similar to the ones below, substituting where appropriate for your information. For example, a "secret" of "verysecret" is probably not a good idea.
Make certain that you have "nat" set to "yes".

The only other thing we need to take care of within Trixbox is a tiny modification to the sip_nat.conf file. Again, we can do this using our web browser. Close the browser window with FreePBX running, and you should be back in the Trixbox admin window. Choose "Config Edit" from the "Asterisk" menu, and then scroll down until you find "sip_nat.conf". In a default installation, it is empty. Put in values like the following:
extern_ip=xxx.xxx.xxx.xxx
localnet=192.168.0.0/255.255.255.0
The first line, extern_ip, is the external (public facing) ip address of your Trixbox. Note that you probably don't have one, so instead put the public IP of whatever router, gateway, etc. you use to get access to the outside world.

The second line, localnet, describes the subnet that your Trixbox installation lives on.
Now, reload your configurations in Trixbox, and we are ready to configure our firewall.

Firewall Modifications

We need to make some modifications on the Trixbox end of the network (i.e. not at home, if that's where your remote extension is, but on the the end of the connection where your Trixbox PBX lives). Specific modifications will vary depending on what you are using for a router/gateway, but in general there are only a few things to change. I am using a Linksys machine as the external gateway, so I made changes as follows:


In essence, forward the following to your Trixbox machine:

5004-5082 udp
16384-16482 udp
10001 - 20001 udp
4569 udp (optional, and only for IAX2 units; ignore if you are just using sip)

Make these changes, and we are ready to set up the phone itself.


Configure the SPA922 IP Phone
As before, I simply unpacked the phone, found a place for it on my desk at home, and plugged it in. After a few seconds, it found itself an IP address and did its best to find dial tone. Naturally, it failed, but I did appreciate the effort.

All configuration on the SPA922 can be done with a web browser... but you need to know what IP address to connect to. After it has powered up, click on the "menu" button on the handset. It looks like a dog-eared piece of paper, just below the voice mail button. Now use the navigation button (big circle with four arrows) to scroll down to Network, and click the select soft button (leftmost, just below the LCD. Its label is part of the LCD). You'll see your phone's IP address displayed on the LCD. Mine was set to 192.168.2.149.

So, fire up your web browser, and go to http://192.168.2.149, or whatever IP address your phone has. You'll see the Linksys screen. Click on "Admin Login" in the upper right hand corner, then "Advanced." Note that by default the phone ships with no password for the admin tool; please remember to change that at some point (like right now).

Click on the Ext1 tab, and scroll down to NAT Settings. Set NAT Mapping Enable and NAT Keepalive Enable to "YES". Scroll down to SIP Settings. Set SIP Port and Ext SIP port both to 5062.

Next scroll down to the "Proxy and Registration" section. Set "Proxy" and "Outbound Proxy" to the external IP address used by your Trixbox machine. Set "Use Outbound Proxy" and "Use OB in Dialog" to "Yes".

Scroll down to Subscriber information, and set User ID to the extension number for your phone, and password to whatever "secret" you set up in Trixbox for this extension.

Now scroll down to Audio Configuration. Set DTMF Tx Method to "Inband+INFO". (Note: I had to do this to get most IVRs to work, i.e. when I call someone and have to press 1 for this, 2 for that, and so forth. YMMV).

Click on "Submit all Changes."

Now, go to the SIP tab. Scroll down to RTP Parameters. Set RTP port min to 16384. Set RTP port max to 16482. Now, scroll down to NAT Support Parameters. Set Handle VIA received, Insert VIA received, Substitute VIA address, Handle VIA rport, and Insert VIA rport all to "Yes."

Save your changes, and in a few moments, you should be able to make calls!

Sunday, October 21, 2007

Alternative to Trixbox coming soon

The folks over at nerdvittles.com have an interesting project in the works -- PBX in a Flash. Apparently they (and others) are getting a bit fed up with the direction that Trixbox is taking; on the nerdvittles site, the authors put it this way: "suffice it to say that it’s just gotten a little too proprietary, too closed, and too commercial for our open source, puritanical tastes."

So they decided to take matters into their own hands, and are working on something called "PBX in a Flash". From the site:


Our up front promise is to keep the project open, participatory, reliable, and fun. After all, that’s what the Asterisk revolution was and is all about. The plan is to provide a free ISO-based offering for home or office use that will run on a dedicated Linux machine. There also will be a VMware image that will run on a Windows desktop. And, for the Mac desktop, we’ll provide both a VMware and a Parallels image.

I'll be interested to see where this goes, and intend to give it a try.

Trixbox and the Linksys SPA922

I got tired of trying to figure out how to wire my office such that we could continue to use the analog phones we have with the Trixbox setup I recently installed. Accordingly, I bit the bullet and ordered some Linksys SPA922 phones as a trial run. These are true IP phones, meaning that all they need hooked up to them is an ethernet cable (and a power adapter, if you are too cheap to purchase the Power over Ethernet adapter).

These are wonderful phones.

Setting it up on the internal network was absolutely trivial. Unpack it, hook up the handset, run an ethernet cable to it, and tell it what extension id and password you want, and you are finished. In fact, it's so easy to set up that I really can't see the point of posting the details here.... the quick start guide that comes with the phone is self explanatory, and so simple my 10 year old daughter could probably figure it out.

As a bonus, the various "star key" combinations are pre-configured to work with Asterisk, so I didn't even have to set those up. Right off the bat the call forward, do-not-disturb, and voice mail keys worked.

Great phone.

Next, I'm going to try to hook one of these up as a remote extension, and have an office phone at home as well. My understanding is that this would be easier with an IAX2 phone, but I don't have one of those, so I'll figure out how to do this with what I have at my disposal.

Thursday, October 18, 2007

Using the Vonage SoftPhone with Asterisk

As promised, here are some more details about setting up an Asterisk system for a small office/home office. Last time we got a single hard line up and running, and this time we are going to add true VOIP functionality to our system.

You may have been reading about Vonage in the news a bit lately. Yes, they are under some serious attacks by the established telcos, but they offer a wonderful service -- easily the best quality VOIP I have tried. More to the point for this exercise, Vonage offers a service that interfaces nicely with Aterisk -- the softphone.

Vonage offers a softphone option for existing customers -- in Canada, at least, it's an add on to an existing service, and costs around $15.00/month. I understand it is less expensive elsewhere, but even at $15.00, it's fairly cheap.

I wanted to have my outgoing calls on the office network not be limited to the number of hard lines from our local telco; voip is, of course, a wonderful alternative to this, and (at least around here) Vonage's offering is every bit as good as a telco. At least none of my customer's have noticed the difference...

Here's how to set up the Vonage softpone as a trunk (inbound and outbound) on Asterisk (specifically on Trixbox).

1) Add a trunk. In FreePBX, choose Setup -> Trunks -> Add Trunk. Name the trunk whatever your softphone number is, i.e. 19995551212.
2) Outbound caller id - this appears to no have effect, but I set mine up anyway, i.e. "Caller id Inc" <19995551212>
3) For "Peer Details" I used this:

allow=all
auth=md5
canreinvite=yes
defaultexpirey=120
dtmfmode=rfc2833
fromdomain=sphone.vopr.vonage.net
fromuser=[vonage phone number]
host=sphone.vopr.vonage.net
insecure=very
nat=yes
port=5061
secret=[secretgiventomebyvonage]
type=friend
username=[vonage phone number]

Note that "secret" and "username" must be changed to whatever you got from Vonage. Also, the "square brackets" are not part of the peer details.

4) Under User Context, I entered this:

auth=md5
canreinvite=no
context=from-pstn
dtmfmode=inband
fromdomain=sphone.vopr.vonage.net
fromuser=[vonage phone number]
host=sphone.vopr.vonage.net
insecure=very
nat=yes
port=5061
secret=[vonage password]
type=friend
username=[vonage phone number]

5) For register string, I used this:

[phone]:[secret]@sphone.vopr.vonage.net:5061

For example, if your phone number is 1-999-555-1212 and your secret is abcd1234, you would enter:

19995551212:abcd1234@sphone.vopr.vonage.net:5061

Save, and your trunk is now active. Next, we need to add outbound routes.

Last time around, we added a context for dialing out by pressing 9. We are going to modify that so that by default, all outbound calls first go out through vonage, and if that fails or is too busy, then use the hard line. This is trival.

Modify your outbound route "0 9_Outside". Scroll down to Trunk Sequence, and use the drop down menus to select the first as being vonage, and the second as your hard line. Save, and you are done.

That was easy.

Tuesday, October 16, 2007

Asterisk, Trixbox, and the Linksys SPA 3102

I have finally completed my Asterisk installation, and have it working. Surprisingly, it was fairly painless. As I had indicated in an earlier post, I intended to get it working using a single incoming analog line, a Linksys Sipura 3000, and a fairly elderly PC. Much to my surprise, I was able to procure a 1.8 GHz Pentium IV machine for less than $200.00, and it works very, very well.

The Linksys Sipura 3000 had been replaced by the SPA 3102 by the time I got around to ordering one, so I bought one from http://www.voipdepot.ca (cheaper shipping, and overnight at that!) It arrived, and here's what I did:

Install Trixbox
This is trival. I downloaded the version 2.2.4 ISO from http://www.trixbox.org, burned a CD and inserted it into the drive on the PC I am using as a PBX. I rebooted, answered a few (obvious) questions, and let it do its thing. Two additional automatic reboots later, Trixbox was installed.
By default, the Trixbox install uses DHCP to get an IP address, and that's no good, so I logged in as root and set the IP address to a static one, so I'd know how to get there. Do this by typing "netconfig" at the prompt, as root, and give it an IP address. Now, reboot one final time.

Configure Trixbox
All configuration is done from a web browser. Assuming you chose 192.168.0.76 as the IP address for your Trixbox machine in the previous step, just fire up your favourite web browser and go there (http://192.168.0.76). We need to get to admin mode, so click on the "[ switch ]" link in the upper right hand corner. You will be prompted for a password. The default username/password combination is "maint/password". We'll change that later.

Now, Choose "FreePBX" from the "Asterisk" menu, and we are ready to start. A new browser window (or tab, depending on your browser) will open. Click on "Tools" in the top menu, and then "Modules" from the menu on the left. Click on "Check for updates online." Click on "Download all". Install all modules.

Now, we need to set up some trunks. In my situation, I have one hard line coming in (a physical telco line) and I'm using Vonage's softphone for an addtional, pure VOIP line. We'll do the hard line first. It's connected using the SPA 3102.

SPA 3102
This is fairly easy to set up. Plug it in, and connect to it using a crossover cable and a PC/Mac/whatever. Go to its built in web browser, and give it a static IP address. I chose 192.168.0.234. The web based admin is typical Linksys -- easy to use. Assuming the IP address you chose is the same as mine, go here: http://192.168.0.234/admin/

Note that there are no passwords set on the SPA 3102 by default. You'll probably want to change that.

I made the following changes to the SPA 3102's default configuration:

1) Remove all "Vertical Service Activation Codes" under Voice/Regional. They conflict with the codes we will use in Asterisk.
2) Under Line 1, Proxy/Registration, I set the Proxy to 192.168.0.76 (the IP of the trixbox machine)
3) On the same screen, I set DTMF Tx Method to Inband+Info
4) On the same screen, I set up the info for the extension we're going to set up in Asterisk shortly -- Display Name = your name, password to whatever you want for a password, User ID = the extension number you are going to assign to the phone hooked up to the SPA 3102.

All done.

Setting up Trunks
Now, let's set up a trunk for this in Asterisk. Back on the FreePBX window in your browser, click on "Setup" on the top menu, then "Trunks" on the left menu. There is a ZAP trunk there, but we'll ignore it. Add a SIP trunk.

Fill in the values as follows, modifying for your particular information as required:

Outbound caller id: "19995551212"
This is your caller id information.

Maximum channels: 1
Trunk Name: SPA3102
Peer Details:

allow=ulaw
canreinvite=no
context=from-pstn
disallow=all
host=192.168.0.234
insecure=very
nat=yes
port=5060
qualify=yes
type=peer

User Context: SPA3102_In
allow=ulaw
canreinvite=no
context=from-pstn
disallow=all
host=192.168.0.76
insecure=very
nat=yes
port=5060
type=user

Now save the info. Okay, we have a trunk. Let's add a method of dialing out to the outside world.

Adding Outbound Routes
Click on "Setup" in the top menu, then Outbound Routes in the left. You probably have a route called "9_Outside", so let's use that. If not, add one and name it 9_Outside.

All we have to do here is specify a dial patter. I want to use "dial 9 for an outside line", so I have this in the dial pattern box:
9|.
That was easy. Now pick SIP/SPA3102 as your trunk, and save your changes.

Next, we need to have a method of receiving calls, so let's add an extension.

Adding an Extension
This is trivial. Click "Setup" in the top menu, then "Extensions" in the left menu. Add an extension. Add a SIP extension. All you really need is the extension number, but voice mail is nice, so scroll down and add that info. Be sure to specify a password for voice mail, and for the extension! If you added extension info to the SPA3102 when you set that up, you might as well enter the same information here....

Save, and you are good do go. Now let's add an inbound route, so we can receive calls.

Adding Inbound Routes
This is fairly easy as well. Just click on "Setup" in the top menu, then "Inbound Routes" in the left menu. Add a route. We are just going to have one for now, and it will handle all calls. Just add a route with the DID info (and everything else) set to defaults (empty) and then under "Set Destination" (at the bottom of the screen) choose "Core" and select the extension you set up a few moments ago.

Change the Passwords!
You really should change the passwords for Trixbox. You will notice a couple of rather profound warnings in the web based admin tool, with links to how to go about changing them. I strongly recommend you do so.

Next time, I'll give details on how to hook Vonage's softphone up , as well as the Linksys SPA922 IP Phone. We'll configure it for use within the network, as well as an external (remote) extension.

Wednesday, September 19, 2007

Excellent IPTables firewall script

Last time I talked a bit about using pf as a firewall, on the various BSDs. Naturally, there are far more installations of Linux out there than there are of FreeBSD, OpenBSD, etc. The current firewall of choice on the linux platform is iptables. One of the best open source firewall configurations I've found using iptables is Arno's IPtables Firewall Script.

There are a few things that you want to keep in mind when you pick a firewall technology:

1) The firewall should be stateful - e.g. the firewall is programmed to distinguish legitimate packets for different types of connections. Only packets matching a known connection state will be allowed by the firewall; others will be rejected.
2) The firewall should be easy to configure
3) The firewall should allow you to easily determine what's going on when you look at the log files.

Arno's script does all of these things, and more. Give it a look.

Friday, September 14, 2007

Using pf as a Firewall

I've long been a fan of FreeBSD (although I also use a Mac, Linux, and Windows machine -- right tool for the job, and all that), and one of the things I like best about the various BSDs is the ease with which you can set up a stateful packet-filtering firewall. To put it simply, pf rocks.

Setting it up for the first time, though, can be a bit of a chore. If you are interested in giving pf a look, here's how you do it on FreeBSD.

Recompile your kernel
For the sake of argument, let's assume that we are going to be setting up a machine called "zeus" as a gateway server with a few simple services running on it. We first need to compile the pf stuff into the kernel, and then install our new kernel. First, get to the right directory:

[tcs@zeus] ~> su -
Password:
1:28PM up 60 days, 3:54, 1 user, load averages: 0.03, 0.01, 0.00
[root@zeus] ~# cd /usr/src/sys/i386/conf/


Now, copy the file GENERIC to some new file (I'm calling my zeus):

[root@zeus] ~# cp GENERIC ZEUS

Edit the file ZEUS and add the following lines just below "options ADAPTIVE_GIANT":

#PF Support
device pf #PF OpenBSD packet-filter firewall
device pflog #logging support interface for PF
device pfsync #synchronization interface for PF

#ALTQ Support
options ALTQ
options ALTQ_CBQ # Class Bases Queueing
options ALTQ_RED # Random Early Drop
options ALTQ_RIO # RED In/Out
options ALTQ_HFSC # Hierarchical Packet Scheduler
options ALTQ_CDNR # Traffic conditioner
options ALTQ_PRIQ # Priority Queueing


Now, we need to compile and install the kernel. Go to the /usr/src directory and execute this command:

make buildkernel KERNCONF=ZEUS

Wait (quite a while). When it's done, type this:

make installkernel KERNCONF=ZEUS

Wait a bit longer. Reboot. If it comes up, congrats -- you have a new kernel.

Enable PF in rc.conf
We need to tell the OS that we want to use pf. Enter the following in /etc/rc.conf

pf_enable="YES"
pf_rules="/etc/pf.conf" # rules definition file for pf
pf_flags="" # additional flags for pfctl startup
pflog_enable="YES" # start pflogd(8)
pflog_logfile="/var/log/pflog" # where pflogd should store the logfile
pflog_flags="" # additional flags for pflogd startup


Set up the firewall: pf.conf
The default rules for pf.conf are very, very detailed. We are going to ignore them, and make our own. First, back up the /etc/pf.conf file that is (probably) there by default:

cd /etc
mv pf.conf pf.conf.dist

Now, edit a new file called pf.conf and enter the file below (each service is mentioned in the comments preceding it):

# define our interfaces. Find yours by typing ifconfig as root
lo="lo0"
ext_if="fxp1" #your external nic
ext_gw="19x.xx.xx.254" #change this to the ip of your gateway router
int_if="fxp0" #your internal nic
oip1="19x.xxx.xxx.222" #change this to your external ip address

#clean everything up (reset to defaults)
scrub in

# nat for internal clients
nat on $int_if from 192.168.0.0/24 to any -> ($int_if)

# Pass/block rules

block in

pass quick on { $lo $int_if } all

# we shouldn't have to do this, but seem to have to on freebsd
pass out on $lo all

# allow ssh to local machine
pass in on $ext_if proto tcp to ($ext_if) port ssh keep state

Save, and you are ready to give things a try!

Helpful hints:

To enable the firewall rules:

pfctl -f /etc/pf.conf

To enable pf:

pfctl -e

To disable pf:

pfctl -d

Friday, September 07, 2007

Secure your ssh with PKI

It shocks me how many otherwise intelligent people leave port 22 wide open on their machines. In case you didn't know, this is the default port for ssh -- an widely used method of making connections to a machine from remote locations.


ssh is a wonderful system. The default install on virtually every unix like system out there (including Linux, the various BSDs, and Mac OS X) is inherently insecure, and subject to brute force attacks. We see these on our servers virtually every day. A brute force attack is shockingly simple to implement -- the attacker simply runs a script that tries many, many username/password combinations until they get in. Once they have an account, it's only a hop, skip and jump to root access.

Then bad things happen.

There are a number of ways to make it tougher for attackers, of course. First, configure your firewall to only allow incoming ssh requests from known, safe IP addresses. Additionally, you should implement PKI security on your ssh system. This is, fortunately, very simple to do.
The process is simple:
  1. Generate your public/private key pair
  2. Install the keys on the machines you are going to use to access the server
  3. Modify your ssh server's config file to require known keys
  4. Restart your server
We are going to generate RSA keys for our client. The public key will live on the remote server, and both keys will live on the client machine. For simplicity, we will generate our keys on the server, and then transfer them to our client machine. Log onto the server as the account you want to generate keys for, and then execute these commands:

server$ cd ~
server$ mkdir .ssh
server$ chmod 700 .ssh
server$ ssh-keygen -q -f ~/.ssh/id_rsa -t rsa
Enter passphrase (empty for no passphrase):
Enter same passphrpase again:

Entering a passphrase is optional.... but do it anyway.
Now lock down the file permissions...

chmod go-w ~/.ssh

Now copy the contents of .ssh directory to your client machine. Use a USB key or some other secure method, just to be safe.
Now we need to modify the /etc/ssh/sshd_config file for our ssh server. Mine looks like this:

Protocol 2
ListenAddress 192.168.5.100

HostKey /etc/ssh/ssh_host_rsa_key

SyslogFacility AUTHPRIV

AuthorizedKeysFile .ssh/id_rsa.pub

HostbasedAuthentication no

PasswordAuthentication no

ChallengeResponseAuthentication no

UsePAM yes

X11Forwarding yes

Subsystem sftp /usr/libexec/openssh/sftp-server

AllowUsers tcs


This is a bare minimum. Note the items in red:
  • your public key must exist in /home/yourhomedirectory/.ssh/id_rsa.pub
  • ChallengeResponseAuthentication disables simple username/passwords to log on
  • AllowUsers is another safety check -- only users who exist here will be able to log in regardless as to what keys they have.
Now, restart your sshd server, and give it a try.


Wednesday, September 05, 2007

Anti-spam for qmail: spamdyke

I have long been a fan of qmail. Yes, I know that it is long in the tooth, and there are a great number of fans of postfix and so forth out there, but say what you will about qmail -- it's solid as a rock, and incredibly fast. I am a big fan of it.

A few years ago I became a fan of the "cookbook" found on www.qmailrocks.org, but it is, sadly, a bit out of date. Nevertheless, careful perusal of various mailing lists and so forth has allowed me to keep up to date with my qmail installs and things are running along smoothly.

Recently, I found another weapon to use in the ongoing battle with spam: spamdyke (http://www.spamdyke.org). This is a great tool for a number of reasons:

  • it works
  • it does not require patching qmail
  • it's free
  • it brings a lot of functionality to the table that is just not in the standard qmail install (patched, qmailrocks version, etc.)
From the site:
spamdyke is a filter for monitoring and intercepting SMTP connections between a remote host and a qmail server. When a connection is established from a spam source (as determined by the active filters), spamdyke will reject the email -- qmail never sees it.
Beyond filtering, spamdyke offers a number of other features:
  • spamdyke supports SMTP AUTH and will even provide SMTP AUTH to an unpatched qmail server.
  • spamdyke supports TLS and will even provide TLS to an unpatched qmail server.
  • spamdyke provides much better, much more complete logging than qmail, using syslogd.
  • spamdyke can log all SMTP traffic to aid troubleshooting.
  • Best of all, using spamdyke does not require patching or recompiling qmail!
Installation is trivial, and it works out of the box, as it were.

Some other qmail related links that might be of help to you if you are looking for a solid, easy to maintain system:
  • FreeBSD Rocks! (http://www.freebsdrocks.net) - a step by step to installing qmail on FreeBSD. This is an excellent successor to qmailrocks.
  • Setting up mailhubs (http://qmail.jms1.net/mailhub.shtml) - how to set up multiple incoming servers all delivering mail to a centralized mailbox machine. Excellent way to share the load on busy sites.
There are many other resources out there, and most of them are linked on the main qmail site (http://www.qmail.org).

Tuesday, September 04, 2007

Another alternative to Parallels: Q


A few days ago I was extolling the virtues of VirtualBox, an alternative virtualization package for Mac OS X that allows me to run FreeBSD, Windows, Linux & so forth on my Mac, without the need to reboot. Well, I just stumbled across another one with the rather memorable name of "Q". You can find it here: http://www.kju-app.org/kju/

I have not tried this package yet, but it looks promising. From their website:

Run Windows, Linux and a lot more Systems on your Mac. Q is a feature packed cocoa port of QEMU: Switch fast between guest PCs. Save and restart guest PCs at any stage. Easily exchange Files between Host and Guest. Q makes use of OS X most advanced technologies like openGL, quartz and coreaudio to accelerate your experience with your guest PC. Please remember: At the present state, QEMU is still considered ALPHA software.

Note the reference to the package being alpha software. I'm not quite ready to install it on the machine that I make my living with, but I'll keep an eye on it.

Use your Blackberry as a bluetooth modem on your Mac

As I mentioned a few days ago, I recently purchased a MacBook. I have been extremely happy with this machine in most respects. The only thing I miss is the ability to use it my Blackberry as a Bluetooth modem. Since I live in Canada, where the data charges are absolutely unreasonable (can you say $10.00/meg after the first meg of traffic??) this has not been a huge problem, but there is a certain sense of security knowing that if I absolutely have to, I can connect to the Internet and get to my servers wherever there happens to be cellular coverage.

Fortunately, I have successfully figured out how to do this. I found my information here and here, although neither post was 100% accurate for my setup. Thus, I decided to share my findings here.

My setup:

  • MacBook (2GHz Core 2 Duo)
  • Mac OS X 10.4.10
  • BlackBerry Pearl (8100)
  • Rogers cellular network
The first step is to download the Blackberry 8100 modem script. Save this to your desktop. If your Mac helpfully appends a .txt extension to the file, rename it so the .txt is missing. Move this file to your Library/Modem Scripts folder. Next, pair the Blackberry with your Mac. This is fairly simple.

First, make sure your Mac is "Discoverable" in the Bluetooth system preferences panel. Then, open the "Options" feature on your Blackberry (in the default interface, it looks like a wrench). Scroll down to Bluetooth, and click on it. Click the menu button (to the left of the scroll ball) and click "Add Device." Your Mac will show up. Choose it. In a few seconds, your Mac will generate a passkey and put it on your screen. Enter that into your Blackberry. The next screen on your Mac will give you two choices -- "Use with Address Book" and "Access the Internet with your phone's data connection". Make sure both are checked, and that you choose "Use a direct, higher speed connection..."

Next, your Mac will ask you for details about your setup. You'll get this screen:


Your Username is "wapuser1", your password is "wap" and your GPRS CID String is "internet.com" (no quotes on anything). Note that these settings are for Rogers Canada. Your mileage may vary.

Make sure you leave "Show modem status in menu bar" checked. Click continue, and you're done.

To connect to the Internet, just click on the phone icon in your menu bar and choose "Connect." To disconnect, go to the same menu and click disconnect.

NOTE: data charges in Canada are very, very high. Make sure you don't overdo it and get a massive phone bill at the end of the month.

Saturday, September 01, 2007

DIY Network Attached Storage


After a (rather busy) summer, I have finally elected to return to my "do it yourself network attached storage" project. I've done some reasearch, and picked my operating system -- FreeNAS (http://www.freenas.org). Their site describes it thusly: "FreeNAS is a free NAS (Network-Attached Storage) server, supporting: CIFS (samba), FTP, NFS, AFP, RSYNC, iSCSI protocols, S.M.A.R.T., local user authentication, Software RAID (0,1,5) with a Full WEB configuration interface."


There are a number of things I really like about this implementation. First, it's tiny -- and I mean really, really small. A full implementation takes about 30 megs for the operating system, leaving the rest of your disk space available for storage. Secondly, it's based on FreeBSD, so you know it's going to be rock solid, and require very little maintenance. Finally, in a heterogeneous network, this is ideal -- it talks to everybody. We have Macs, linux work stations, and windows all trying to play nicely together. This solution is perfect for our needs.

Give it a look.  It's stable as a rock, and works like a charm.

Tuesday, August 28, 2007

Windows on a Mac - Alternatives to Parallels

I recently purchased a MacBook (Core 2 Duo) and bumped the RAM up to 4 gigs (yes, you can do that if you elect to purchase your memory from somewhere other than the Apple store). With all this extra memory and a number of unused licenses for Windows XP, I thought I'd download a trial copy of Parallels and give it a go. Parallels has this nifty little feature called the "transporter" that claims to be able to migrate an entire Windows install from some other machine on your local network and automagically install it on your Mac.

Sounds good, I think. I'll give it a shot.

So, I download and install the software, and run the installer. First, the transporter simply failed, several times over, so I gave up on that, and decided to do a simple clean install. This worked better, for awhile, but hung at "33 minutes left to install" and stayed there. Overnight.

Now, I'm sure this is an odd case, as lots and lots of people are successfully using the software, but I have a fairly low tolerance for software that does not work as advertised the first time (or the third -- I gave it three tries). So, I started looking to see what else was available.

The first thing that came up, of course, was Apple's Bootcamp. It looked promising, and I gave it a try. It works exceptionally well. The disadvantage, of course, is that it's a dual boot solution. You are either on Windows, or on the Mac, and never the twain shall meet. Not exactly what I was looking for. I'll give it this, though; it's fast. Since Bootcamp gives all the hardware directly to Windows, this isn't surprising, but it's arguably the best experience I've ever had with Windows on a laptop. Plus, Apple thoughtfully gives you a driver disk that enables things like the iSight video, the Bluetooth tools, the Airport wireless, and so on. Extremely well done. I just don't want to boot into Windows to do whatever trivial task I have to do that requires it. I want to have Windows run at the same time as Mac OSX.

Then I stumbled across VirtualBox. The site describes it thusly: " innotek VirtualBox is a family of powerful x86 virtualization products for enterprise as well as home use. Not only is VirtualBox an extremely feature rich, high performance product for enterprise customers, it is also the only professional solution that is freely available as Open Source Software under the terms of the GNU General Public License (GPL). See "About VirtualBox" for an introduction; see "innotek" for more about our company."

It's open source, it's free, and it exists for Mac OSX. This is exactly what I was looking for. I'm surprised I had not heard of this product before, as it exists for a lot of different platforms. I downloaded it, installed Windows, and was off to the races.

There are some differences between Parallels and VirtualBox. First, the desktop integration with Parallels is much smoother -- Windows does not live in its own window, as it were. At least that's what it says on their website; I never actually got that far. In VirtualBox, the entire Windows desktop exists by itself. I can copy and paste between Mac and Windows apps, though, so that's not such a big deal. The other thing to note is that it does not support the various resolutions of my monitor (neither the LCD panel that's part of the MacBook, nor the external Compaq 19" widescreen I have hooked up). I get 800x600, or 1024x768, and that's it.

Other than that, it works great. I highly recommend it.

Sunday, August 05, 2007

Photos of Wifi Antenna

Someone was asking for photos of the Wifi antenna I built late last year. Apparently the instructions on how the "tupperware" part was used were a bit unclear. I hope a photograph is more helpful.

Saturday, June 02, 2007

Build your own NAS device

I believe it is a universal truth that data will always expand to fill all available media -- even if you do nothing with that data. At least, that always seems the case with us.

We have been considering picking up a few Network Attached Storage (NAS) devices for awhile now, so as to increase storage capacity without adding significantly to the space and power consumption in our server facility.

Naturally, this seems to me to be an excellent opportunity to repurpose some old hardware and build my own NAS device.

Before you go too far down this road, though, consider the fact that there are quite a few not-too-expensive NAS devices out there that will work quite well for small office/home office environments. A quick visit to tigerdirect.ca, for instance, shows that you can find a decent sized NAS for well under $500.00 without too much effort. However, serious NAS devices with RAID configurations, redundancy, and 1 TB+ disk space are still very pricey -- so much so that it is probably cheaper to build your own.

I'm going to start the research now, and keep you posted. Here are my goals:

1) Must support Windows/Mac clients
2) Must be fault tolerant (i.e. RAID)
3) Small form factor
4) 1TB+ storage capacity
5) minimum power consumption/heat generation

I'll keep you posted.

Update: This looks like a nice case for the price....

Monday, May 28, 2007

Installing Mono on CentOS 5

There are a variety of ways to install Mono. I elected to use CentOS version 5 as the base operating system, and since this is basically RedHat Enterprise Server with some simple re-branding, it seemed that the best way to do this was via the Yum package manager. Well, this sounds great in theory, but it broke. It turns out that binaries created for CentOS 4 are not exactly compatible with CentOS 5.

Who knew?

So, it's back to an installation from source. Fortunately, this is not terribly difficult. Here is the basic system/software I was installing on:

  • CentOS 5
  • Dual Core Pentium IV processor (3 GHz)
  • Apache 2.0.59
  • Mono 1.2.4
Apache is installed from source -- I can't help it. I like to know exactly what's installed, and how it's configured; I still don't trust RPMs.

I elected to install Mono in /opt. The directory didn't exist, so I first created it. I logged in, su-d to root, and created the directory:

[root@luther]# cd /
[root@luther]# mkdir opt

Then I changed to the newly created directory, and downloaded the necessary files. In order to serve .aspx files, we need the mono base, the XSP server, and mod_mono. I got all those files using the trust wget application:

[root@luther]# cd opt
[root@luther]# wget http://go-mono.com/sources/mono/mono-1.2.4.tar.bz2
[root@luther]# wget http://go-mono.com/sources/xsp/xsp-1.2.4.tar.bz2
[root@luther]# wget http://go-mono.com/sources/mod_mono/mod_mono-1.2.4.tar.bz2

Now, upack everything:

[root@luther]# tar jxvmfp *.bz2

Change to the newly created mono-1.2.4 directory, and configure mono. Notice the parameter I passed the configure program; it tells it to install mono in /opt/mono. I then make, and make install the application.

[root@luther]# cd mono-1.2.4
[root@luther]# ./configure --prefix=/opt/mono
[root@luther]# make ; make install

Wait a bit, and voila -- you have the mono base installed. Now let's do the same thing for Xsp. Xsp is the web server for mono -- it handles the compilation and delivery of .aspx files. This is pretty simple as well:

[root@luther]# cd ../xsp-1.2.4
[root@luther]# ./configure --prefix=/opt/mono
[root@luther]# make ; make install

If "configure" or "make" complains about not finding something, try executing this:

[root@luther]# export PATH=/opt/mono/bin:$PATH

Then run the above commands again.

Now, on to mod_mono:

[root@luther]# cd ../mod_mono-1.2.4
[root@luther]# ./configure --prefix=/opt/mono \
--with-mono-prefix=/opt/mono \
--with-apr-config=/usr/local/apache2/bin/apr-config
[root@luther]# make ; make install

When this is done, if you go to /usr/local/apache2/modules (or wherever you told it apache lives) and look at the files there, you should see these: mod_mono.so (a symlink) and mod_mono.so.0.0.0. These are the modules (well, there's only really one -- mod_mono.so is a pointer to mod_mono.so.0.0.0) that apache needs to invoke xsp and deliver .aspx files.

Now we need to configure apache.

Open the apache configuration file with your fvourite editor (we'll use vi):

[root@luther]# vi /usr/local/apache2/conf/httpd.conf

Go to the bottom of that file, and append this text:

<IfModule !mod_mono.c>
LoadModule mono_module /usr/local/apache2/modules/mod_mono.so
AddType application/x-asp-net .aspx
AddType application/x-asp-net .asmx
AddType application/x-asp-net .ashx
AddType application/x-asp-net .asax
AddType application/x-asp-net .ascx
AddType application/x-asp-net .soap
AddType application/x-asp-net .rem
AddType application/x-asp-net .axd
AddType application/x-asp-net .cs
AddType application/x-asp-net .config
AddType application/x-asp-net .Config
AddType application/x-asp-net .dll
AddType application/x-asp-net .asp
DirectoryIndex index.aspx
DirectoryIndex Default.aspx
DirectoryIndex default.aspx
</IfModule>

Now, we'll configure a virtual host to serve up the test suite that ships with mono. In the virtual host section of your file, put in something like this:

<VirtualHost 198.xxx.xxx.xxx:80>
DocumentRoot /home/httpd/aspx/html
ServerName aspx.yoursite.com
Alias /demo /opt/mono/lib/xsp/test
MonoApplications "/demo:/opt/mono/lib/xsp/test"
MonoServerPath /opt/mono/lib/mono/1.0/mod-mono-server.exe
<Directory /opt/mono/lib/xps/test>
SetHandler mono
</Directory>
</VirtualHost>

Note that you should specify your actual DocumentRoot and IP address to whatever you are using. This tells Apache that everything served under http://aspx.yoursite.com/demo is actually found in /opt/mono/lib/xsp/test, and handled by mono.

Restart apache, and go to http://aspx.yoursite.com/demo/index.aspx

You should see the full mono test suite.

Cool, eh?

Note that with this configuration, I can also put aspx files right in the document root for my virtual host, and they will be handled by mono as well. For example, I put this in the root level of the web server and called it test.aspx:

<html>
<body>
<% Response.Write("Hello World!"); %>
</body>
</html>

And it compiled and worked just fine.