Last time I mentioned that I had used the Linksys SPA922 IP Phone as the "handset of choice" for phones. I also indicated that I wanted to have one as a remote extension -- i.e., it has a standard extension number, is part of the PBX system, can make and receive calls, etc., but is physically outside of the network.
This turned out to be relatively easy, once I figured out the firewall settings.
Setting up a remote extension using Asterisk/Trixbox is not that difficult, and consists of three basic steps:
1) Create the extension in Trixbox
2) Make some firewall modifications on the trixbox end
3) Plug in and configure the remote extension itself (i.e. the physical phone)
These steps are explained in more detail below:
Create the Extension in Trixbox
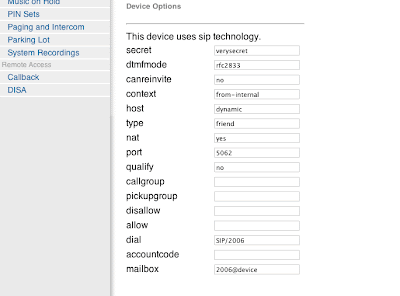
First we need to have an extension to play with, so we'll log onto our Trixbox installation using our favourite web browser, and choose "FreePBX" from the "Asterisk" menu. This pops up a new browser window (or tab) and allows us to create a new extension, among other things. Choose "Setup" from the top menu, then "Extensions" from the menu on the left, and create a new SIP extension. Fill in values similar to the ones below, substituting where appropriate for your information. For example, a "secret" of "verysecret" is probably not a good idea.
Make certain that you have "nat" set to "yes".
The only other thing we need to take care of within Trixbox is a tiny modification to the sip_nat.conf file. Again, we can do this using our web browser. Close the browser window with FreePBX running, and you should be back in the Trixbox admin window. Choose "Config Edit" from the "Asterisk" menu, and then scroll down until you find "sip_nat.conf". In a default installation, it is empty. Put in values like the following:
extern_ip=xxx.xxx.xxx.xxxlocalnet=192.168.0.0/255.255.255.0
The first line, extern_ip, is the external (public facing) ip address of your Trixbox. Note that you probably don't have one, so instead put the public IP of whatever router, gateway, etc. you use to get access to the outside world.
The second line, localnet, describes the subnet that your Trixbox installation lives on.
Now, reload your configurations in Trixbox, and we are ready to configure our firewall.
Firewall Modifications
We need to make some modifications on the Trixbox end of the network (i.e. not at home, if that's where your remote extension is, but on the the end of the connection where your Trixbox PBX lives). Specific modifications will vary depending on what you are using for a router/gateway, but in general there are only a few things to change. I am using a Linksys machine as the external gateway, so I made changes as follows:
We need to make some modifications on the Trixbox end of the network (i.e. not at home, if that's where your remote extension is, but on the the end of the connection where your Trixbox PBX lives). Specific modifications will vary depending on what you are using for a router/gateway, but in general there are only a few things to change. I am using a Linksys machine as the external gateway, so I made changes as follows:

In essence, forward the following to your Trixbox machine:
5004-5082 udp
16384-16482 udp
10001 - 20001 udp
4569 udp (optional, and only for IAX2 units; ignore if you are just using sip)
Make these changes, and we are ready to set up the phone itself.
Configure the SPA922 IP Phone
As before, I simply unpacked the phone, found a place for it on my desk at home, and plugged it in. After a few seconds, it found itself an IP address and did its best to find dial tone. Naturally, it failed, but I did appreciate the effort.
All configuration on the SPA922 can be done with a web browser... but you need to know what IP address to connect to. After it has powered up, click on the "menu" button on the handset. It looks like a dog-eared piece of paper, just below the voice mail button. Now use the navigation button (big circle with four arrows) to scroll down to Network, and click the select soft button (leftmost, just below the LCD. Its label is part of the LCD). You'll see your phone's IP address displayed on the LCD. Mine was set to 192.168.2.149.
So, fire up your web browser, and go to http://192.168.2.149, or whatever IP address your phone has. You'll see the Linksys screen. Click on "Admin Login" in the upper right hand corner, then "Advanced." Note that by default the phone ships with no password for the admin tool; please remember to change that at some point (like right now).
Click on the Ext1 tab, and scroll down to NAT Settings. Set NAT Mapping Enable and NAT Keepalive Enable to "YES". Scroll down to SIP Settings. Set SIP Port and Ext SIP port both to 5062.
Next scroll down to the "Proxy and Registration" section. Set "Proxy" and "Outbound Proxy" to the external IP address used by your Trixbox machine. Set "Use Outbound Proxy" and "Use OB in Dialog" to "Yes".
Scroll down to Subscriber information, and set User ID to the extension number for your phone, and password to whatever "secret" you set up in Trixbox for this extension.
Now scroll down to Audio Configuration. Set DTMF Tx Method to "Inband+INFO". (Note: I had to do this to get most IVRs to work, i.e. when I call someone and have to press 1 for this, 2 for that, and so forth. YMMV).
Click on "Submit all Changes."
Now, go to the SIP tab. Scroll down to RTP Parameters. Set RTP port min to 16384. Set RTP port max to 16482. Now, scroll down to NAT Support Parameters. Set Handle VIA received, Insert VIA received, Substitute VIA address, Handle VIA rport, and Insert VIA rport all to "Yes."
Save your changes, and in a few moments, you should be able to make calls!